Do your own oil change and save money
More than a great way to save money, knowing how to change your vehicle’s engine oil may be regarded as a rite of passage.
Vehicle manufacturers typically recommend an oil change every 5,000 kilometers or whenever the oil in the dipstick already has sludgy deposits or grainy particles of dirt.
It’s not terribly complicated, but it’s a little trickier than what your neighbor or friend may tell you (so it would be prudent to observe a mechanic first before attempting this to your own vehicle).
Nevertheless, Inquirer Motoring has these reminders and step-by-step guide on how to properly and successfully accomplish the task.
But before you get started, make sure you have these: at least four to five liters of new oil (check your vehicle’s manual or a mechanic for the proper SAE viscosity, API performance and quantity required for your vehicle’s engine); oil filter (local dealers usually stock the appropriate type and size for your vehicle); a set of wrench, oil filter wrench, a basin to catch the old oil, funnel, a couple of clean rags, newspaper, hand-cleaning solution or at least a disposable latex gloves.
1. Prepping up the vehicle
Cold oil will not drain properly, so before starting work, Top Gear Philippines magazine technical editor and custom tuning shop SpeedLab co-owner Ferman Lao suggests driving your car around to bring the oil to normal operating temperature.
Switch off the engine. Raise the hood and look for the oil filler cap (usually marked with the symbol of an oil can) and loosen it to avoid creating a vacuum (this will allow the old engine oil to drain from the bottom more freely).
2. Elevate front tires
If you don’t have a ramp that would enable you to safely and comfortably slide underneath the vehicle’s engine, a hydraulic jack will always suffice.
However, never rely on a jack to hold your vehicle up. It’s dangerous and unstable, Lao reminded.
Use a block of wood or anything solid and place it underneath the front chassis. This is important should the hydraulic jack fail or slip and you are still underneath.
Engage your handbrake and make sure both rear wheels are braced with wooden blocks to prevent the vehicle from rolling forward or backward.
Put your vehicle in first gear if you have a manual transmission or in “Park” if you have an automatic transmission.
3. Locate the drain plug
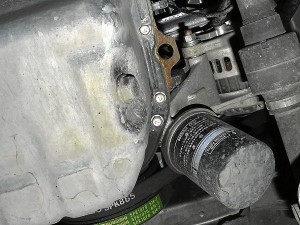
Locate the drain plug on the bottom of the engine sump or oil pan (this is usually the lowest part of the engine).
Using your wrench, turn the drain plug counter-clockwise until it rotates freely.
At this point point, place the basin underneath the drain plug (position the newspaper so that any wayward drops of oil will be absorbed) and finish removing the plug by hand.
Be careful of the oil, since it may release rapidly and is likely to be a little hot. Try not to drop the drain plug together with a sealing washer into the pan.
4. Loosen the oil filter
Locate the oil filter casing, which should be near the drain plug area and is cylindrical in shape. Loosen the oil filter by turning it counter-clockwise with a filter wrench.
As you complete the removal by hand, remember the order of parts as you replace them later.
Also, remember that the oil filter may be filled with warm oil and feel slightly heavy, so carefully ease it down and away from the engine and tip its contents into the drain pan.
Take your rag and wipe in and around the filter seat on the engine.
5. Insert new filter
As you insert a new filter and use your finger to apply a light film of oil (new or used) to the gasket (the circular edge of the filter itself), which acts as a sealant.
Carefully screw the new filter onto the threaded oil line, turning it clockwise.
Once aligned properly, the filter will thread on easily. Tighten the filter by hand, taking care not to over tighten.
Screw the plug in by hand and finish by tightening it with a wrench. Again, don’t over-tighten.
6. Return the drain plug
Once the old oil is fully drained (which should not take an hour), make sure the drain plug and a new washer (Lao suggests using a new one) are screwed back underneath.
At this time, remove all the supporting blocks before releasing the hydraulic jack. In case the vehicle in on a ramp, release the handbrake and allow the vehicle to slowly roll back down to level ground (do not turn the engine on!).
7. Pour new engine oil
On the top of the engine, unscrew the oil filler cap and proceed to fill the engine with the required quantity of oil.
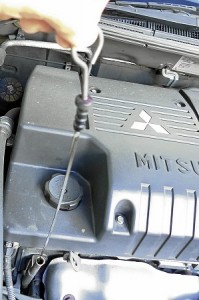
Use a funnel to avoid spillage. Check the dipstick to ensure if proper fill level is already reached (there are markers on the dipstick).
Replace the cap and wipe off any spillage.
8. Start the engine
As you turn the engine on, the oil light should light up momentarily.
Run the engine for several minutes, then switch it off and check the dipstick once again to ensure check if engine oil is already on its proper level. According to Lao, it is likely that you will have to add some more.
Remember to check the vehicle’s underneath for leaks, especially around the oil filter and sump drain plug.
9. Dispose old oil properly
The final, and in some ways the most important, step to anyone’s oil change is to ensure that the old oil is properly discarded.
Lao said that discarded engine oil is highly toxic to the environment and it is of the utmost importance that it is disposed in a safe fashion.
Transfer the old oil into a sealed container and consult your local authorities about options for its safe disposal.


